How To Remove Tint From Car Windows
A practical step-by-step guide to how to remove tint from car windows, including preparation, instructions, common issues, tips, and next steps.
How To Remove Tint From Car Windows
Removing window tint from a car requires careful heating, peeling, and adhesive cleanup to avoid damaging the rear defroster lines or leaving sticky residue. This guide covers preparation, step-by-step removal for side and rear windows, plus troubleshooting common issues like broken tint or stubborn glue. You'll learn how to use a heat gun or steamer, adhesive removers, and safe scraping techniques. Always work in a warm, ventilated area and protect interior panels. After removal, clean the glass thoroughly and inspect for damage. This method works for most factory and aftermarket films, but be cautious with older tint that may be brittle.
Fast Answer
- Heat the tint with a heat gun or steamer to soften the adhesive, then peel it off slowly using a razor blade or your fingers, keeping the film cool by misting with water.
- Remove leftover glue with a commercial adhesive remover or a mixture of soap and water, using a plastic scraper to avoid scratching the glass.
Before You Start
- Gather a heat gun or handheld steamer, a sharp utility knife or razor blade, a spray bottle with soapy water, and a plastic scraper or old credit card.
- Work in a warm, shaded environment or garage to keep the glass warm but not hot, which helps the adhesive release.
- Protect the car's interior by covering door panels, seats, and the dashboard with plastic sheeting or old towels to catch dripping adhesive.
- Open the windows slightly to improve ventilation and reduce fumes from adhesive removers, but ensure the glass is accessible.
Step-by-Step Instructions
Prepare the Work Area and Glass Surface
Begin by parking your car in a warm, shaded area. Clean the tinted glass with a mild glass cleaner and let it dry completely. This removes dirt and oils that could interfere with peeling. Cover the door panels and seats with plastic sheeting to protect them from adhesive or cleaning chemicals. If the vehicle has a rear defroster, note its grid lines. Check the window edges for loose or bubbling tint; these are the easiest starting points. Use a razor blade to gently lift a corner of the tint. If the film is stubborn, use a heat gun on low setting held about 6 inches away, moving it in a sweeping motion. Do not concentrate heat on one spot for more than a few seconds. This step ensures that the adhesive is pliable and reduces the risk of tearing the film. A smooth start makes the rest of the removal easier.
Heating and Lifting the Tint Edge
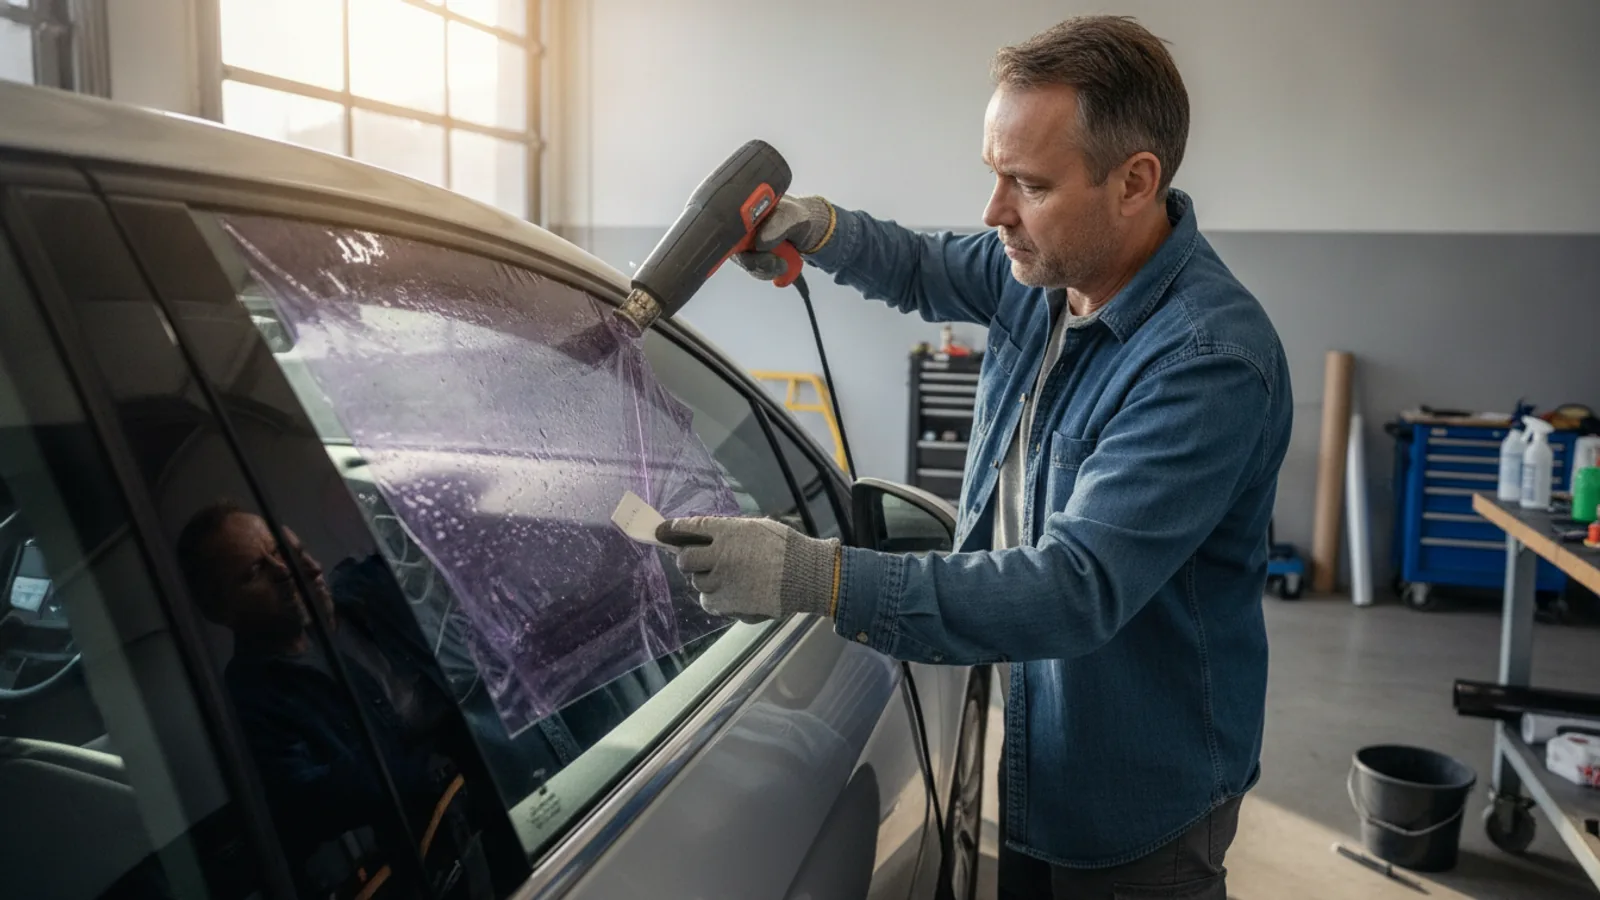
Once you've chosen a starting corner, apply heat with a heat gun or steamer to that corner for about 10-15 seconds. The film should feel warm to the touch, but not scorching. Use a razor blade to lift the corner, sliding it under the film at a shallow angle. If you don't have a lifted corner, you can create one by scoring the tint with a sharp blade, but be careful not to scratch the glass. After lifting, spray a bit of soapy water under the film to keep the adhesive moist. Then begin to peel the film away from the glass, pulling at a 180-degree angle (back toward the opposite side of the window). This helps prevent tearing. If the film rips, simply re-heat the torn edge and continue. The key is to maintain a slow, steady peel, adding heat as needed. This method minimizes adhesive left behind and avoids leaving a sticky mess.
Peeling the Main Film Slowly
Now that you have a good grip on the corner, continue to peel the film off the glass. Work across the window, applying heat just ahead of the peel line. Keep the glass moist with soapy water so the adhesive doesn't dry onto the glass. Pull the film downward or sideways, but always at a 180-degree angle from the glass surface. This reduces the stress on the film and prevents it from tearing into small pieces. If the film starts to break, stop and reheat the area to soften it. Continue until the entire sheet is removed. For large windows like the rear windshield, you may need to work in sections. It's normal for some adhesive to remain on the glass. Do not worry about getting every bit now; you'll clean it in a later step. A successful peel takes patience, so allocate at least an hour per window.
Removing Adhesive Residue
After the film is off, you'll see a layer of adhesive on the glass. Spray it generously with a commercial adhesive remover or a solution of warm water and dish soap. Let it sit for a few minutes to soften. Then use a plastic scraper or a soft sponge to gently rub the adhesive off in a circular motion. For stubborn spots, apply more solution and let it soak longer. Avoid using metal scrapers or razor blades directly on the glass, as they can scratch it. If you're working on the rear window, be extra careful around the defroster lines; use a soft cloth or your fingers to work the adhesive off. You may need to reapply the remover several times. The goal is to leave the glass clean and smooth. This step is crucial because leftover adhesive can make new tint installation difficult or cause streaking.
Cleaning the Glass Thoroughly
Once all adhesive is removed, clean the glass with a high-quality glass cleaner and a lint-free microfiber cloth. Wipe in straight lines, both vertically and horizontally, to spot any remaining streaks or adhesive. Inspect the glass in sunlight to see if any residue is left. If you notice sticky spots, repeat the adhesive removal process. Also, examine the glass for any scratches or damage that may have occurred. If you plan to re-tint, the glass must be perfectly clean and dry. If not, apply a glass protectant to restore clarity. This step ensures that the window is ready for new tint or just a clean, clear surface. A final thorough cleaning also removes any oily residue from the adhesive remover, which could attract dust and dirt.
Final Inspection and Interior Cleanup
Finally, inspect all windows to ensure no tint or adhesive is left. Use a bright light to check for any missed spots. Then, remove the protective plastic from the door panels and seats. Clean any surfaces that may have gotten adhesive or solution on them using a mild interior cleaner. Wipe the window channels and seals to remove any debris. If you removed the rear tint, test the defroster by turning it on for a few minutes to see if all lines work. If any lines are broken, you may need to repair them with a conductive repair kit. This step is vital to leave the vehicle in good condition. Also, check that the windows roll up and down smoothly, as they may have been affected by the removal process. Once you're satisfied, your car is ready.
Quick Reference
| Situation | Action | Why it helps |
|---|---|---|
| You notice the tint is starting to peel at a corner. | Use a steamer or heat gun to soften the entire area near the peel, then gently lift that corner with a razor blade and start peeling slowly, applying heat ahead of the film. | Softening the adhesive prevents tearing and leaves less glue behind, making the removal faster and cleaner. |
| You encounter old, brittle tint that shatters when you pull it. | Stop pulling immediately. Reheat the section thoroughly with a steamer or heat gun set on low, and use a razor blade to gently lift small sections at a time, going slowly. | Heating makes the film flexible enough to peel without breaking, and working in small pieces reduces frustration and glass damage risk. |
| There is a stubborn adhesive residue that won't come off with soap and water. | Apply a dedicated adhesive remover or rubbing alcohol to the residue, let it soak for several minutes, then use a plastic scraper or an old credit card to scrape off the softened glue. | A stronger solvent breaks down the adhesive's chemical bond, and a soft scraper protects the glass from scratches. |
Common Issues
- The tint tears into tiny pieces while peeling.: Reheat the area with a heat gun or steamer until the film becomes pliable. Then use a razor blade to lift a new edge and continue peeling slowly, applying heat as you go. Avoid pulling at an angle that strains the film.
- Adhesive residue is extremely sticky and difficult to remove from the rear window defroster lines.: Soak the area with a cloth dipped in adhesive remover or isopropyl alcohol for several minutes. Then use a soft bristle toothbrush or your fingers to gently work the glue loose. Never use a metal scraper, as it can damage the defroster grid.
- The glass has a hazy film even after cleaning with glass cleaner.: Mix a small amount of rubbing alcohol with water and wipe the glass with a microfiber cloth. If the haze persists, it may be residual adhesive; apply an adhesive remover and let it sit, then rinse. The haze should lift off.
Advanced Tips
- Use a handheld steamer rather than a heat gun for a more even, moist heat that reduces the risk of glass cracking.
- Work in sections for large rear windows: treat each panel individually to maintain control and achieve a clean peel.
- After removal, apply a glass polish with a machine polisher to remove any minor adhesive-induced residue and restore a pristine finish.
Final Checklist
- Confirm that all tint film has been completely removed from every window, including corners and edges.
- Clean the glass thoroughly to leave no sticky residue or streaks; use a bright light to inspect.
- Verify that the rear defroster lines are intact and working by turning them on and checking for heat.
- Remove all protective coverings and clean the interior surfaces with a silicone-free cleaner to avoid leaving marks.
FAQ
Can I remove car window tint with a hair dryer instead of a heat gun?
Yes, a hair dryer can work, but it may take longer and not get as hot. Hold it close to the tint and use it on high heat. You'll need more patience and maybe several minutes per section. The heat will soften the adhesive, allowing you to peel the film. Just be sure not to hold it too close to one spot for too long.
Will removing the rear window tint ruin my rear defroster?
If you use plastic scrapers and are careful, you can avoid damaging the defroster. However, using metal blades or excessive force can scratch the lines, causing them to stop working. Always use soft tools and gentle pressure when cleaning adhesive near the defroster grid.
What if the tint is too old and crumbles into many pieces?
For very old, brittle tint, use a steamer to saturate it with heat and moisture. Peel as much as possible, and for the pieces that remain, use a spray of adhesive remover and a soft scraper. You may have to work in tiny sections, but it's still manageable. Some residue may require repeated applications.